
Have you ever taken a really basic, staple wardrobe item and decided to jazz it up a little?
As you may be aware, I have accumulated a rather large collection of me made sweatshirts. I make no apologies for this; I enjoy the quick, satisfying nature of making them and, since I work from home most of the time, they perfectly meet my day to day wardrobe need for comfy, warm clothing.

But you do get to the point where you want to make more sweatshirts but are struggling to make them feel different. I had the idea months ago to apply a bold patch or appliqué to the front of a basic grey sweatshirt, but for it to meet the image I had in my mind it needed to have set in sleeves, rather than my favourite Linden’s raglan sleeves.
The Named clothing Sloane has appealed to me for a while; I liked its slightly smarter feel, with the shorter length and those long darts up the front bodice, it just looks like something you’ve made a bit more effort for. And it met the set in sleeve requirement so when Named had a pdf sale on a while ago, I bought it.
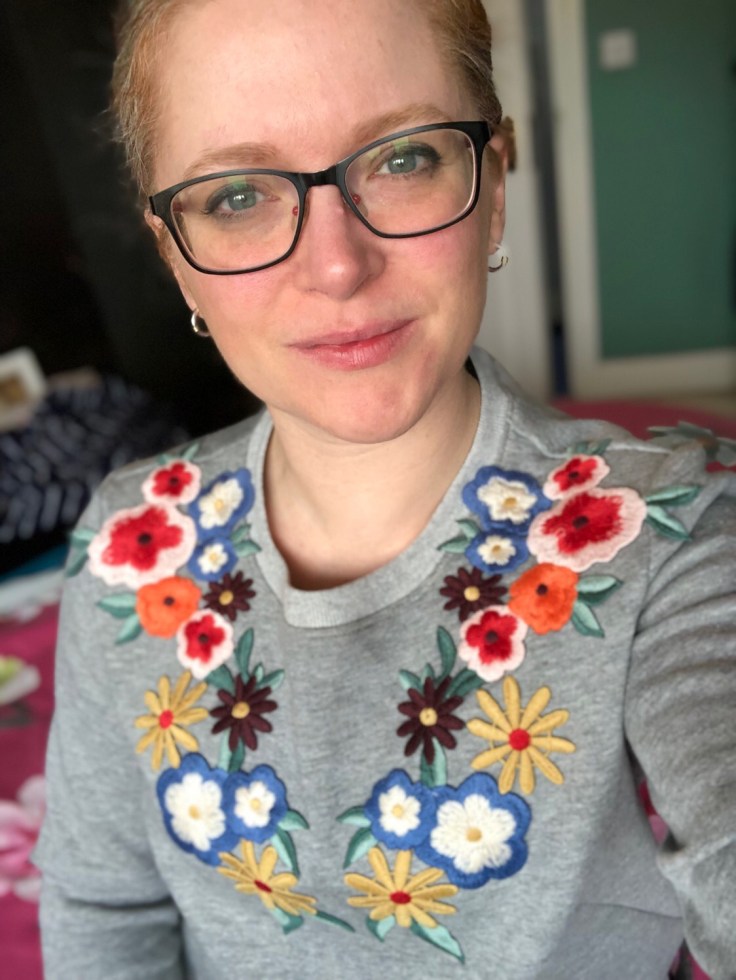
I also bought the most amazing, huge pair of patches from Stoff & Stil when I was visiting my best friend in Munich last October.
In typical me fashion, I then got sidetracked. I saw a tutorial in Simply Sewing magazine for embroidering a slogan onto a sweatshirt and decided that would be a cool thing to try, plus would allow me to toile the pattern before putting my precious patches onto another version.
A template was provided for the embroidery so I cut the Sloane out of some gorgeous fleece backed sweatshirting and marked it up. For the first of many, many times because holding the fabric to embroider one part of it results in the chalk rubbing off other parts of it 🤦🏼♀️.
I enjoyed the embroidery and took quite some time with it, picking it up and putting it down as the mood struck. It’s just backstitch but I spent some time making sure the stitches were small and hopefully very secure!
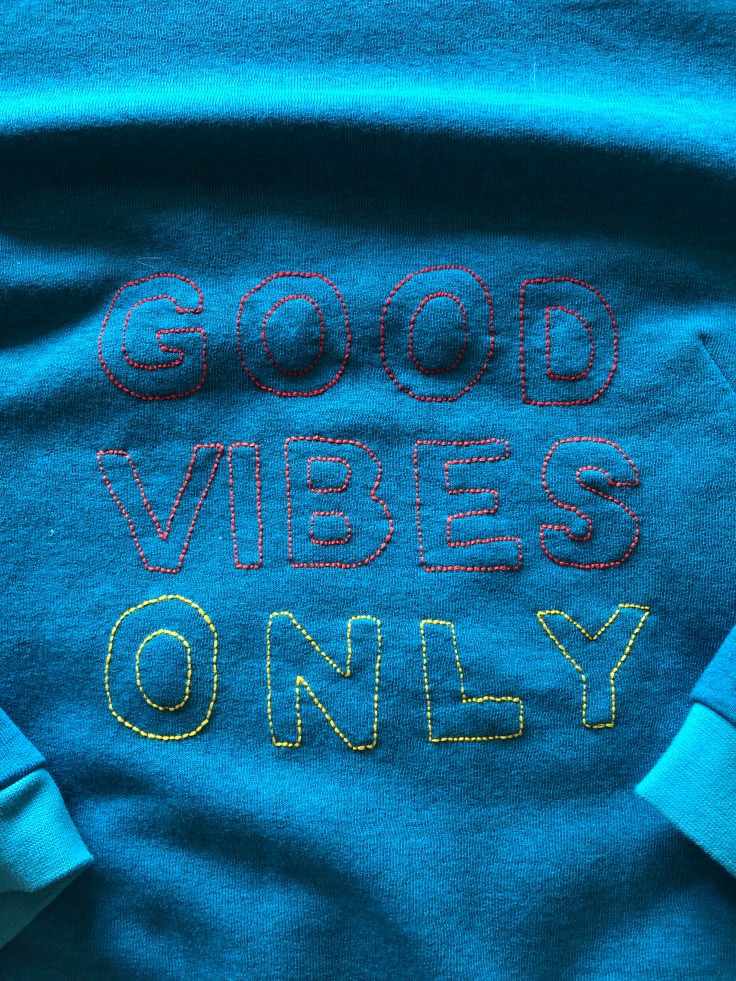
When it came to assembling the jumper, it was pretty straightforward. However, when I tried it on, I realised two things. Firstly, the sleeves are quite short. They’re not too short visually but they have that feeling of wanting to pull them down all the time that’s annoying. And secondly, I didn’t place that time consuming embroidery in the best place! It would look better to me if it started higher up the chest.

Oh well. Live and learn.
I moved on to the dreamt of grey sweatshirt. To make sure I was happy with the placement of the flowers, I assembled the top as far as the shoulder seams and neckband then placed it on my dress form and started pinning. I realised pretty quickly that I needed to attach the sleeves as well as the flowers were wider than the shoulders. Sleeves are inserted flat so that was no problem and I was soon pinning away.

I got the placement as I wanted it and then moved to press everything in place. This patch came with an adhesive back which in theory firmly attaches to your fabric when ironed. Hmm. I can’t say I ever entirely trust that but, in this case, the extremely stinky glue actually didn’t adhere too well to the fabric so I found myself starting to stitch it in place!
Before you question my sanity/ dedication to my vision, let me stress that I didn’t sew everything down. But I did stitch around the largest flowers and down the centre of each and every leaf to prevent them curling away from the cloth as time went by. I left my bobbin thread in a grey that matched the fabric but switched my needle thread for different coloured sections of the patch. I reduced the stitch length and the speed and sloooooooowly got those patches secured to the top.
For this second version I also used some cuffing by Poppy which I am a huge fan of. It feels great, looks really professional and, in an added bonus for this pattern, is deeper than the suggested pattern piece and hence gives me that extra bit of sleeve length I was after. I stitched them closed with my sewing machine, pressed the seam open and then topstitched down each side to hold it nearly in place. Not sure if that’s what you’re meant to do but I’m happy with the end result. One pack of cuffing JUST gave me enough for the cuffs and waistband; I used a plain grey cuffing for the neck.
And there you have it. Two rather different sweatshirts, both a bit above the ordinary level and one which totally meets my vision of an embellished sweatshirt.
Happy sewist!
Becca x


A beautiful top. Well done!
LikeLiked by 1 person