
There are lots of different ways to step outside your comfort zone when sewing. You could make a new type of garment: select a style you’ve never been confident in: even try a totally new fabric type. For me, I recently combined sewing something that I don’t feel that confident in with a new(ish) fabric type.
I say ish. Strictly speaking I have kind of sewn swimwear before now. Two years ago, for our holiday in Florida, I sewed rash vests for myself and my husband, and swim shorts for me and my oldest daughter.

But the whole point of both those garments was to cover up my skin and keep it safe from the sun. Not really the point of a bikini!
Don’t ask me why I chose to make a bikini this year. Like most other people, it’s not like we’re going anywhere warm any time soon. Our trip to Northumberland was beautiful, but definitely not swimsuit weather. So there was no burning need. What there was, was fabric in the stash because, when I made those garments two years ago, I did my usual thing of vastly overestimating how much sewing time I’d have and therefore buying more swimwear fabric.
On an whim, I decided to buy the new Helen’s Closet “Sandpiper” swimsuit and dive right in.

The style of the suit appealed to me because, being a pasty red head, I burn really easily. Especially on the chest, which this two piece gives excellent coverage on. That seems to be really unusual for swimsuit patterns, but this one was definitely designed to be worn whilst actually swimming. Or paddle boarding or surfing or whatever (see Helen’s launch blog for all the details)
I’m a big fan of Helen’s patterns: they are well put together, with excellent instructions, and they tend to be very wearable styles. She’s also good on blog posts offering advice on hacking and altering, which adds value to the patterns. One of the blogs I spotted was around adding cups to the top for support: more on that soon!
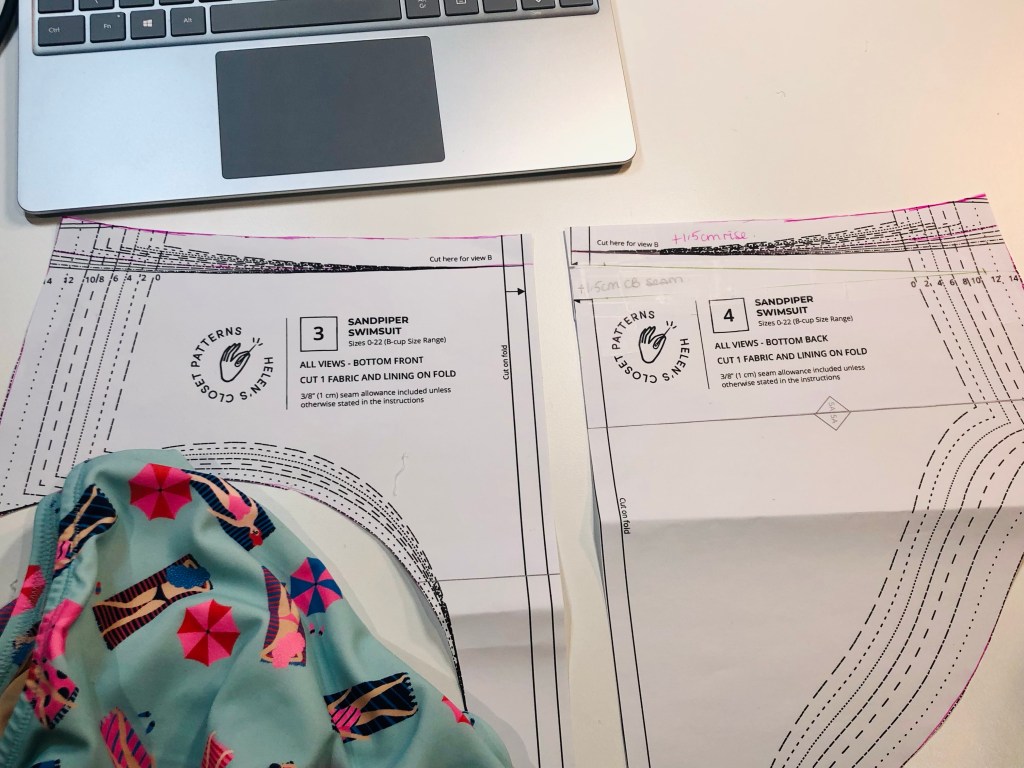
Going by my measurements, I cut a size 10 top and size 14 bottoms. I chose to make the view A top and started with the view B bottoms, but made a couple of adjustments. Firstly, I made my usual full bum adjustment, which simply involves adding 1.5cm to the CB seam, grading to nothing at the side seam. I then straighten up the CB.
I had a good look at the hashtag on Instagram and decided that, whilst I wasn’t keen on the very high waisted view A bottoms, I also felt that the low cut view B were too low. With this pattern that was easily solved: the pattern piece for the bottoms is the same, with two different cut lines depending on the version you select. I simply measured up 1.5cm from the lower of the two lines to get a higher cut version (on both the front and back pieces!) My adjusted pattern pieces ended up looking like this:
Let’s talk a bit more about fabrics and supplies. For the unadjusted version of the suit, it’s pretty simple: you need swimsuit fabric, swimsuit lining and swimwear elastic. From what I’ve been able to source in the UK, there are basically two types of swimwear elastic: there’s the clear plastic stuff which is more easy to come by, and there’s the woven stuff, which is harder to come by. Not that swimwear supplies are easy to come by! I got hold of some of the woven elastic. The pattern specifies the width you require, but honestly, I went with what I could find, which was from Fit2Sew and was actually OK to work with. Far, far easier to persuade to behave under the machine needle than the clear plastic stuff, that’s for sure!
My swimwear lining was also from Fit2Sew and I think I got this rather gorgeous swimwear fabric from Sew Me Sunshine last year (possibly!) It’s a great, fun print with good stretch and recovery. I had a metre of it and it was plenty for this pattern. In fact, there’s enough left that I might make another top to match.
Now, if you want to follow Helen’s blog post to add cups to your top (which, as a D cup, I was keen to do), you will also need swimwear cups. And this is where it all went horribly wrong and I should have known better!
I ordered Prym swimwear cups and, when they came, was rather surprised at their rigidity. I was expecting something like you get in a commercial swimsuit: not much in the way of structure, just something to give me a little extra coverage. What I got was a pair of cups with so much structure they could have served as body armour.
Like a fool, I decided it would be fine once it was on and proceeded to follow the instructions to add cups to the lining fabric before sewing the lining and outer together. And let me tell you, with such rigid cups, this was no easy task! Wrestling the damn cups under the needle without overly stretching that lining fabric out? Bloody nightmare!
Still I persevered. I sewed the lining and outer together: I put the elastic into the neck and armholes (also made more difficult by the super rigid cups) and I put the band on the bottom. The end result?
I tried my new bikini on and realised that I could have given Madonna in her Blonde Ambition phase a run for her money!
In the end, after much deliberation, I have carefully unpicked the cups from the lining. This does leave me with a small cut in the lining where the peak of each cup was, but I think even that slight flaw looks better than the pointy cup scenario!
And this is where I have to be brave. I’ve always tried to be very honest on this blog. I share my actual measurements, whether they’re as I might like them to be or not. I share photos I’ve taken myself, despite me not being that great.
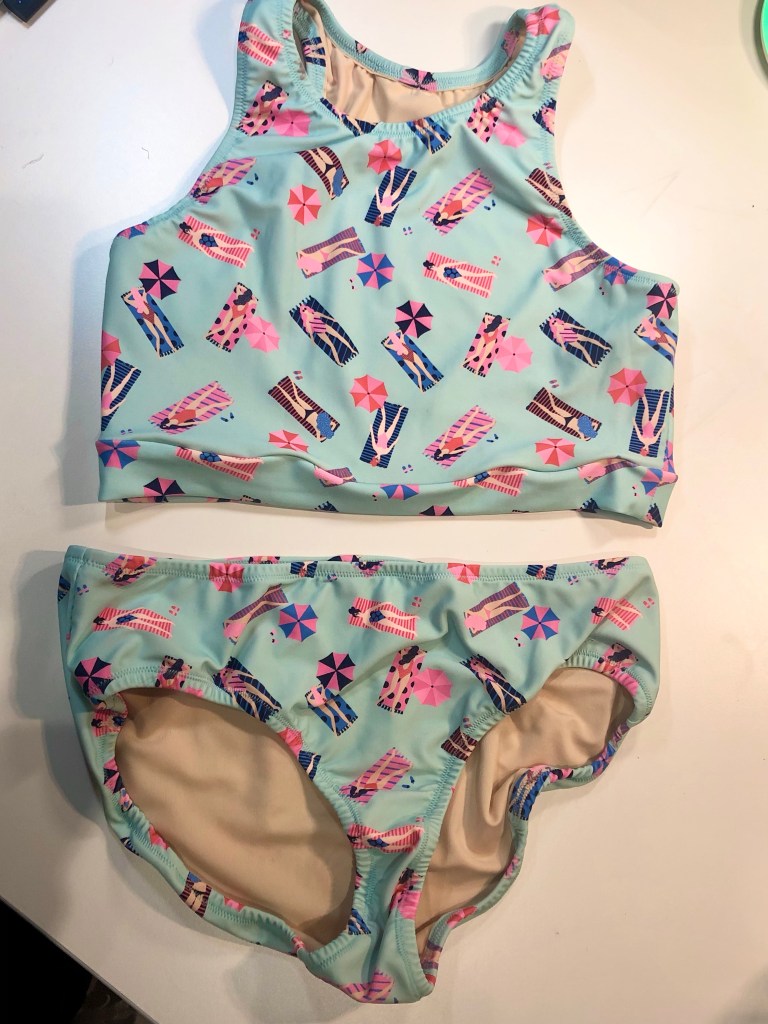
But this is a bikini and the temptation to just give you a flat lay is HUGE. Except that, without me in it, the elastic makes the edges of the suit pull together so it doesn’t lie flat and look attractive. I don’t know why this has happened more so to me than for some of the examples on Instagram, but it honestly doesn’t matter because they do lay flat on me, which is more important after all!
For me, above all else, that is my stomach. Not just because I’m a 40 something mum of two who’s put on a few extra lockdown pounds. But because I have a pretty large scar down my belly which warps the skin around it and has prevented me from ever having a flat stomach, even when I weighed less than 8 stone (not recommended when you’re 5’7″). When I was 4, I had appendicitis. Unfortunately, my GP hadn’t heard that red heads can have exceptionally high pain thresholds and told my mum she was being fussy and that I had gastroenteritis. By the time I was rushed to hospital, my appendix had ruptured and my insides were such a mess that the surgeon simply sliced me down the middle to try and find out what was going on.
That surgeon saved my life. But it took years before I could cope with being seen anywhere in a bikini, spending my teenaged years swimming solely in one piece suits, believing myself hideous. So these pictures are a leap. A massive, uncomfortable leap. But I’m trying very hard to accept my body for its strength and to get past my hang ups so that those two girls of mine don’t grow up thinking it’s normal to not be happy in your own skin.
So, here you go: this is me in my pale, scarred glory, wearing a me made swimsuit. These pictures are before the removal of the scary cups, so rest assured that, by nature, I am not nearly so gravity defying, and am all the better for it!


I would totally recommend this pattern to anyone who actually wants to be able to move comfortably in their swimwear. This feels totally secure: the bottoms fit me better than anything I’ve ever bought in the shops and the top definitely gives that all important sun protection. I feel totally confident that I’ll be able to move around as much as I like without flashing anyone in this, and to back this up, I intend to wear it to take the kids to a waterpark tomorrow. Where I shall run around after them, and splash, and go down the slides, and absolutely not be one of those mums who is so unhappy in her own skin that she can’t bare it long enough to play in the water with her kids.
And that’s something to be thankful for.
Becca x
PS If anyone does know where to source less scary swimwear cups in the UK, I’d love to know about them!!
Details
Pattern
Fabric
My measurements
Bust : 36″
Waist : 32″
Hips : 42″
Size cut
Adjustments made
Future adjustments?
Make again?


Love this post xx
LikeLike
Thank you 😘
LikeLike
brave lady for making your own swimwear! I saw contestants on GBSB do it once, and no way would I be able to cope with stretchy lycra fabric. The pattern you chose is a lovely style on you. The bra part looks very sports wear. I’m sure you could wear that with a pair of leggings and go jogging (especially if you leave the gravity defying cups in!) ^^
Hope you and the kids have great fun at the waterpark tomorrow.
LikeLiked by 1 person
😂😂😂 maybe that’s what the manufacturers were picturing!
LikeLike
Stunning! I hope I’ll be able to make my own swimwear one day. And honestly you look beautiful and have a great figure. It must feel so satisfying to finally be able to wear it after all that work!
LikeLike
Thank you! And I’d say go for it: it wasn’t nearly as tricky as I was expecting because this pattern was straightforwars
LikeLiked by 1 person
Really enjoyed reading this, you and your bikini look great. Really useful to see how you do the full bum adjustment too, I often find close fitting bottoms “dip” at the back, and messing with the rise doesn’t seem to help. Now I see the pattern pieces, I can tell I’ve been adding the height in the wrong place – penny drop moment!
LikeLiked by 1 person
It took me years to work out that adjustment, it was only when I did a pattern cutting course and was shown it that it clicked. Seems bonkers that 1.5cm makes the difference, but that’s all it takes for me!
LikeLike
Really enjoyed reading this, you and your bikini look great! Also really useful to see how you do a full bum adjustment. I often find close fitting bottoms “dip” at the back, and messing with the rise never seemed to work. Now I see your pattern pieces it makes sense – I was adding height in the wrong place, penny drop moment!
LikeLike
Well done, I just made it – well the top, I didn’t have time to make the bottoms before we went away #lastminutesewing!!! I put a power mesh bra in it, which worked really well 😁
LikeLiked by 1 person