

Like a lot of parents, I kind of got a few days warning that lockdown was coming. My employer had told staff to work from home wherever possible a week before the schools closed, so we knew it was coming. And, like a lot of people, I had a strong feeling of panic, combined with some, as it turned out unrealistic, optimism about how much sewing time I would gain.
In that last Friday I had before non working days became a thing of the past, I desperately started pattern prep and cutting out on a coat. My thought was that, the last time I had a big life event to get through, I made a coat and it really helped. Of course, that time around the event was my youngest starting school, which involved my taking time off to support her going for a few hours at a time. Which gave me sewing time. But still, I finally cut into the kit that I bought when this pattern was first released, desperately hoping it would keep me sane through lockdown.
Four months later, and with my sanity very much clinging by a thread (not helped by the impending, childcare-less school holidays), I finally have a finished coat.

Like a lot of people, I found that lockdown did not in any way give me any time to myself. And on the rare nights when it did, a big, complicated sew wasn’t the answer. I forced myself through around half the instructions, doggedly clinging to my usual policy of not moving on to another project without finishing, before sanity dawned and pointed out that, if sewing were to keep me sane, then swift, easy sews were probably the answer. And by the way, the shops are shut and the children have grown: perhaps leggings and tshirts for them might be more the thing?

So I left it lying there for a few weeks. And then, when I came back to it, I fell afoul of dodgy memory. I was quite, quite sure that I had cut three front facing pieces out of my fashion fabric AND my interfacing, and yet there was only one fashion fabric piece there. HOW COULD THIS HAPPEN? I blamed the children. I shouted at my husband. I cried a bit. And, after another couple of weeks, I started tracing out the required pattern piece again, intending to cut two more facing pieces out of what was left of my fabric, on the cross grain.
It was only at this point, literally as I was writing the instruction onto my newly traced out piece, that I realised that there had only ever been one facing piece in fashion fabric. Nothing had gone missing, except my memory and a fair chunk of my marbles. I apologised to my husband and shamefacedly finished my coat.

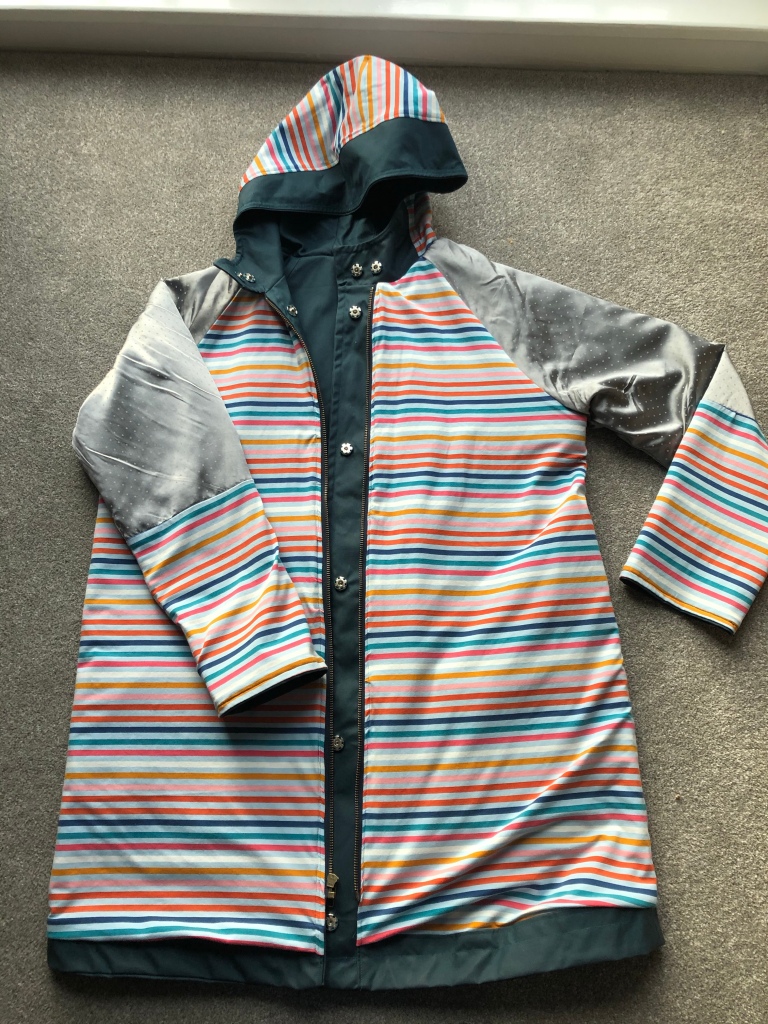
The coat in question is the Tilly and the Buttons Eden coat. I saw this when at the Kntting and Stitching Show at Earl’s Court, then bought it online because they didn’t have the beautiful “peacock” colour with them at the time. But it was then such an expense that I got scared and put it off. And then it was winter and I wanted to make a waxed jacket, not a winter coat, so I delayed a bit more. There’s a fair chance that it would still be sitting in kit form had lockdown not happened!
The kit came with a deep green, waxed cotton, a striped jersey for the lining, the paper pattern and a little bag full of “all the notions you need”. Unless, of course, you want to make the longer version with a zip. The zip provided proved to be the shorter of the two lengths, which also caused a delay in making whilst I waited for Royal Mail to deliver the right length of zip!

I spent quite a lot of time before that fateful Friday dithering about the sleeve lining. I love the pictured jersey lining, but I absolutely hate that feeling when you’re putting a coat on of your top’s sleeves sticking to the lining and rolling up around you upper arms, cutting off all circulation! I eventually bought (again, at the Knitting and Stitching Show, with the same friend, at Alexandra Palace) some pale grey lining material. I traced out the sleeve pattern and then sliced it in two around 2/3 of the way down. I added seam allowances to both new pieces, cut the top one out of lining and the bottom out of jersey, and carried on. The only other change I made was when bagging it out: I finished the sleeve lining separately before bagging it out as I thought the lining fabric was likely to disintegrate as I tugged the whole coat through the hole!
Being a Tilly pattern, the instructions were really clear throughout. This is, after all, her specialty. Whilst my machine had fun now and again getting through the many, many layers of fabric in some places, by and large that was the only problem I had. I found my hump jumper gadget massively useful, as was the Wondertape I used to attach the patch pockets. I find when using such bulky fabrics that pins distort things too much, so tape is definitely the way forward.

Where I usually grade between a size 4 and a 5 on Tilly patterns, I went for a 5 to 6 for this one. I like my coats to feel roomy and I wanted plenty of space for a few extra layers underneath, given this is meant to be a waterproof coat. I went for the longer length simply because I wanted this to be a real waterproof and I’ve decided that I’m too old to get my bum wet for the sake of a trendier, hip length garment!
The only thing I’d change size wise if I were to make it again would be to slightly increase the sleeve length. I love the look on the pattern envelope of the turned back cuffs showing off the beautiful jersey, but the finished sleeves are only just long enough and there’s definitely no extra there to turn back. If that’s the look you’re after, I’d consider adding a little extra to the sleeves.

The front placket closes with large press studs, which I hand stitched on. I also chose to attach them to the pocket flaps, but again I had to send off for additional supplies because the “includes everything kit” didn’t include enough press studs for you to do that to both pockets, just one. This did annoy me, because I don’t remember anything that said the kit only included notions for the shorter jacket, but to be fair, that could be my memory!

You can see in the photo above the one thing I didn’t love: the pattern doesn’t instruct you to finish the top edge of the pocket flap before attaching it to the coat front, and yet I could definitely see the raw edge peeping out. I’m unsure whether I did something wrong, but I ended up hand stitching over the raw edge using a very small blanket stitch to cover the raw edges and make it look smarter. Were I to make it again, I would finish that edge before attaching it to the coat.
I’m genuinely thrilled with the finished coat. The recent crap weather has allowed me to confirm that yes, it is indeed waterproof, even when you stand in the rain in the park for 2 hours so your children can have a grass fight. (With each other, obviously, not with the new coat!) The hood is large enough to keep my hair dry and provide some glasses protection (and I have a large head!)
And there is something slightly magical about having made a coat. It’s like it’s a “proper” garment somehow, in the same way that jeans are; people just don’t expect you to have made things like that, even when they know you sew. It feels wonderful on, and now I’m alternating between this and my Kelly anorak and feeling remarkably smug either way!
Have you tackled any major projects during lockdown? Or has your sew-jo gone AWOL? Either way, I hope you’re OK.
Becca x
Details
Pattern Eden coat by Tilly and the Buttons
Fabric Waxed cotton outer / jersey lining / polyester lining for the sleeves
My measurements
Bust: 36″
Waist: 32″
Hips: 42″
Size cut 5 grading to 6 on hips
Adjustments made adjusted sleeve lining to be part jersey, part poly lining
Future adjustments? Possibly slightly lengthen the sleeve to allow for turn up cuff.
Make again? Not sure: it’s a great pattern but I don’t know that I need multiple versions. Perhaps when this one wears out!


It looks awesome! 😍
Well done Becca 💪 I feel the need to get a wiggle on with mine xx
LikeLiked by 1 person
Thanks love! It is worth making: significant testing the last couple of weeks has confirmed its waterproof status! And I think I have sufficient jersey left for a tshirt which is a bonus!
LikeLike
I love your finished coat. The use of smooth grey sleeve lining looks like a very practical improvement. I have the Eden pattern, and am dying to make it, but can’t decide on fabric.
LikeLiked by 1 person
I think that’s why I splurged on the kit: I didn’t have to worry about getting a suitable fabric!
LikeLiked by 1 person
You are fast becoming Queen of Coats! This looks just the thing for a changeable British summer, and I really love the stripy lining fabric. I hope it doesn’t have to stand up to too many more grass fights in soggy parks though 🙂
LikeLiked by 1 person
😂😂 I definitely wouldn’t go that far, but thank you! It seems to be spending a fair amount of time in a somewhat soggy park at the moment, but it’s worth it for the girls to get chance to play near their friends
LikeLiked by 1 person
Nice! I still haven’t made myself a coat for the in between months. I can’t decide on a pattern. Thanks for sharing this one. It looks great!
LikeLiked by 1 person
It’s lovely! It’s such a usable shape/length but the color is so beautiful that it still looks fun, not ‘just’ practical.
LikeLiked by 1 person
Thank you! That’s exactly what I was after 😀
LikeLike