

Hello! Hope all is well in your corner of the world. Today’s post is about my most recent make and the title kind of gives the game away: all did not go according to plan!
Do you ever feel like some makes have it in for you? This one was one of those.
It started quite well. The pattern was the McCalls drapey cardigan pattern which came free in Love Sewing magazine. I think it’s the previous issue I’m afraid, but it was a lovely waterfall front cardigan which I thought looked very useful and wearable and mentally added to the sewing list.
Then Mum commented on how nice it was when leafing through the magazine one afternoon at our house. Could this be the birthday present I was after?
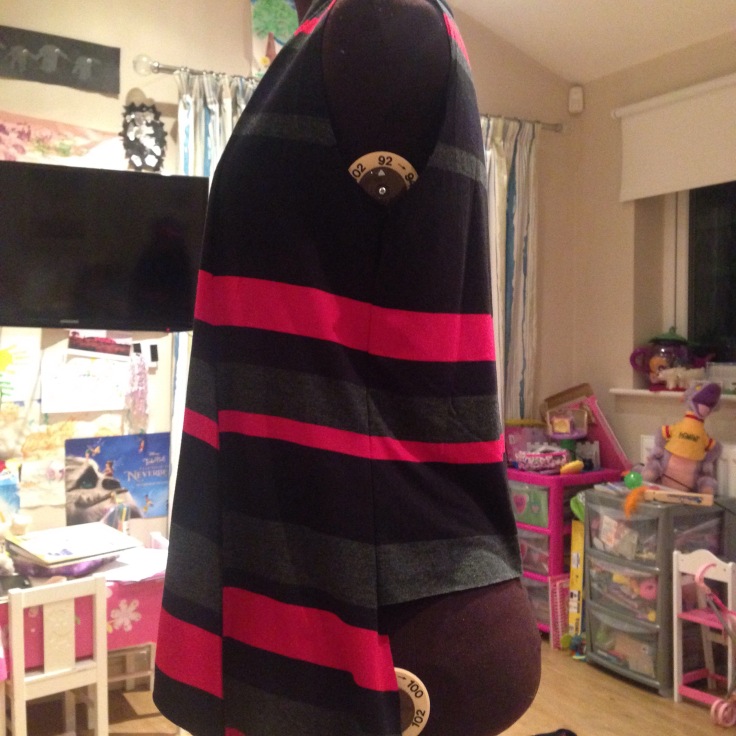
The fabric was the most gorgeous remnant I picked up at the Shuttle at Shipley. At £10 for 1.8m of “ex-designer” jersey it was a great price and I loved the colour combination. It’s kind of hard to see but the black stripes are actually partially black and partially deep navy. It shouldn’t work but it does! And it feels wonderful.

This picture actually shows the main issue I had but I’ll come back to that!
I spent a LONG time laying the pattern pieces out on fabric so as to match the stripes across the different pieces as much as possible. I use my sewing machine for sewing knits, fitted with a walking foot and a jersey needle I find it works beautifully. However, after sewing the front pieces and back piece together I decided to brave the overlocker to finish the seams (I still haven’t worked out how you would turn corners or pivot on the overlocker so that’s out)
I did some testing on the offcuts and set off quite merrily, the first straight seam went well…and then on the next, the damn thing ate the fabric to the point where I had to cut bits off to get it out of the overlocker! Aaargh! Thankfully it didn’t eat past the seam allowance so all was not lost. I spent half an hour trying again and again to thread it so that it actually caught all the threads when it started sewing again (did I mention I’m no good at this?) and then got it sewing again. And it looked like this.
Many, many helpful, kind comments later (thank you Instagram community yet again!) I upped the tension considerably to 5,5,7,8 and it worked! Hurrah!
All was going swimmingly, with very professional looking finishing off, until it got to sewing the side seams together. At which point, I realised there was a hell of a lot more side seam at the front than at the back. What???
After lots of frantic checking of cut piece against pattern piece and one pattern piece against another pattern piece, I found the source of the problem. Love Sewing had split the back bodice pattern piece into two pieces to get everything onto one sheet of paper for their supplement; however, they hadn’t highlighted this and as I’d only looked at the pattern piece through a piece of dot and cross paper, I hadn’t seen the little note that mentioned you needed to stick one piece to another to get the full pattern piece.
I went to bed at this point, utterly distraught. There wasn’t enough fabric to cut the piece again; even if there had been, I didn’t think the silky, drapey knit would survive being unpicked to that extent. I couldn’t see a way to put a panel in that would keep the flowy feel of the pattern and I just couldn’t see another answer. And it would happen on a one off piece of fabric destined for Mum’s birthday present, wouldn’t it!
I ended up doing an emergency dash to Fabworks next day on the way to Mum’s house to get replacement fabric to start again. Obviously other things fell in my shopping bag, but that’s just the nature of Fabworks! But, although lovely, none of them seemed as nice or matched Mum’s preferred colours as well as this one did.
Then, when I got to her house, Mum handed me a waterfall cardigan she’d bought herself that she’d decided she couldn’t wear as it swamped her, “as they all seem to” she said.
Interesting. Wonder whether I could turn my disaster garment into a cropped cardigan that would better suit Mum’s 5’2″ frame?
Deciding that I couldn’t really make it any worse, I laid my partially completed cardigan out on the floor and attacked it with the scissors. I used the bottom of the original pattern pieces to map out the cutting line wanted and tried to preserve as much length as possible.

I finished the rest of the garment quite easily, taking the minimal hem on the bottom seam possible – literally finished the edge on the overlocker, pressed it under and topstitched.

I did find it odd setting sleeves into a knit garment rather than doing the sleeves flat before sewing the side seam, it’s not something I’d done on knits before and it certainly didn’t feel as easy.
And on the subject of sleeves, the model in Love Sewing must have the arms of an orangutan! You’re supposed to put cuffs on the end of the sleeve but I tried it on me before I got that far and even at 5’7″, those sleeves were way too long for me! So I turned a rather hefty 3″ under and hemmed it; I figure if she doesn’t like it, that gives me plenty of fabric to work with.
So, do I like the finished garment?


I think so? I’m not entirely sure. On me, it is just below the waist band on my jeans. Which I’m hoping on 5″ shorter Mum will get it to a flattering high hip position that won’t swamp her. I’m happy with the finish on most of it (slight error around the shoulder seam which I can see because I know it’s there but which Mr RW assures me isn’t really visible!) and I certainly think it will coordinate with mum’s wardrobe.
But I think it will only be part of the birthday present, rather than the whole thing!
Here’s hoping she likes it!
Have you ever rescued a disaster and ended up with a garment that made you happy?
Becca x


I think you did a great job and well done for not giving up,that sounds so stressful. It’s funny how some sewing projects run so smoothly and then on some days everything goes wrong…
LikeLiked by 1 person
Good on you for keeping going! I was making the Sailor Top by Fancy Tiger Crafts and all was moving along well until I went to attach the facing. It just… didn’t… fit. Like unwearable. We had done a fit in class (this was a class project) so I couldn’t understand what was wrong. I ripped out and re-sewed 3 times and then the fourth time I was like, I’m just finishing the seams. That’s it. Then I realised… it was on backwards. Gahhh! I was about to do a post on it when I bumped into the teacher from the class who said bring it in and we can fix it, so I’m hopiinngg it will end up ok. I wouldn’t even have bothered normally but I really like the fabric, just like you! Anyway, to answer your question – I’m hoping I will like it in the end, yes! 🙂
LikeLiked by 1 person
Blimey, that sounds awful! I’m not sure I would have made it to attempt 3!
LikeLike
Nice save! My garments rarely get rescued and more often than not see the inside of the bin… I’m not very good at pushing through and fixing them!
LikeLike
Nice save! My garments rarely get saved if they end up like that and will usually get thrown away! I definitely don’t have the patience to find solutions!
LikeLike
Honestly I’m usually the same, it was just the perfect fabric for Mum that had me persevering!
LikeLiked by 1 person
Great solution. As a 5 footer myself I lop at least five inches off most patterns! She’ll love it I’m sure.
LikeLiked by 1 person
Thank you! I’m hoping she’ll get some wear out of it
LikeLike
Great save! It looks as tho’ it was always meant to be that length. I’m a great believer in everything happens for a reason, so now your mum’s going to really pleased with her new cardi.
When I made my Colette Albion coat I snipped into the sleeve head when I was trimming the seam allowance. I almost cried! I ended up adding an extra piece of fabric with a little tab. It looked better than the other sleeve in the end! 😀
LikeLiked by 1 person
Thank you! It’s hard to see sometimes when you know what you were aiming for in the first place, you see what isn’t there instead of what is I think!
LikeLiked by 1 person
Well done you!! I would totally have given up but you’ve ended up with something brilliant looking. I’m sure your Mum will love it – particularly because she will appreciate the work you put in.
I’ve actually made this cardigan too (I totally ignored the sleeve instruction and set them in flat! Life’s too short to ease in knit sleeves!! 😂) and I left off the cuffs like you did! I left the length long because I wanted a slouchy long cardy for around home, and it is well past my butt – and I’m about you Mum’s height (there’s a pic on my blog to show the length I think). I’d say this shorter version will fit your Mum perfectly!
LikeLike
Thanks! Totally agree with you on the sleeves, if I do another one I won’t do it this way. I think she’s happy with it , can be hard to tell!
LikeLike
Well done for persevering with this one, sounds frustrating! Considered sewing this one up myself, so interesting reading. Hope your mum likes it 🙂
LikeLiked by 1 person
Well I think you saved it! It looks lovely! Isn’t it a terrible thing when you think things are not going well? I had a dress pattern like that once. I didn’t cut it out because I couldn’t figure out what all the funny shaped pieces were. After what felt like hours I finally figured out that the two back pieces of the dress were built with two pieces each. (Hope that made sense!) Anyway I love your fabric… I think I may have something similar in my stash!
LikeLike